Att Ios Ui Navigation Bar
The navigation bar contains navigation buttons for a navigation controller. The title in the navigation bar is the title of the current view controller.
* * *
## Sample Code and Steps
1. Create a View Application.
2. Now, select AppDelegate.h and add a navigation controller property as follows:
```objc
#import
@class ViewController;
@interface AppDelegate : UIResponder
@property (strong, nonatomic) UIWindow *window;
@property (strong, nonatomic) ViewController *viewController;
@property (strong, nonatomic) UINavigationController *navController;
@end
3. Update the application: `didFinishLaunchingWithOptions:` method in AppDelegate.m to assign the navigation controller and make it the window’s root view controller, as shown below:
```objc
- (BOOL)application:(UIApplication *)application didFinishLaunchingWithOptions:(NSDictionary *)launchOptions {
self.window = [ initWithFrame: [ bounds]];
// Override point for customization after application launch.
self.viewController = [ initWithNibName:@"ViewController" bundle:nil];
// Navigation controller init with ViewController as root
UINavigationController *navController = [ initWithRootViewController:self.viewController];
self.window.rootViewController = navController;
[self.window makeKeyAndVisible];
return YES;
}
4. Now, add a new class file `TempViewController` by selecting **File** → **New** → **File...** → Objective-C Class, then name the class `TempViewController` with `UIViewController` as its superclass.
5. Add `navButton` in `ViewController.h`, as follows:
```objc
// ViewController.h
#import
@interface ViewController : UIViewController{
UIButton *navButton;
}
@end
6. Now add the method `addNavigationBarItem` and call it in `viewDidLoad`.
7. Create a method for the navigation item.
8. We also need to create another method to navigate to the other view controller `TempViewController`.
9. The updated `ViewController.m` is as follows:
```objc
// ViewController.m
#import "ViewController.h"
#import "TempViewController.h"
@interface ViewController ()
@end
@implementation ViewController
- (void)viewDidLoad {
;
;
// Do any additional setup after loading the view, typically from a nib
}
- (void)didReceiveMemoryWarning {
;
// Dispose of any resources that can be recreated.
}
-(IBAction)pushNewView:(id)sender{
TempViewController *tempVC =[ initWithNibName:@"TempViewController" bundle:nil];
[self.navigationController pushViewController:tempVC animated:YES];
}
-(IBAction)myButtonClicked:(id)sender{
// toggle hidden state for navButton
[navButton setHidden:!navButton.hidden];
}
-(void)addNavigationBarButton{
UIBarButtonItem *myNavBtn = [ initWithTitle: @"MyButton" style:UIBarButtonItemStyleBordered target: self action:@selector(myButtonClicked:)];
[self.navigationController.navigationBar setBarStyle:UIBarStyleBlack];
[self.navigationItem setRightBarButtonItem:myNavBtn];
// create a navigation push button that is initially hidden
navButton = [UIButton buttonWithType:UIButtonTypeRoundedRect];
[navButton setFrame:CGRectMake(60, 50, 200, 40)];
[navButton setTitle:@"Push Navigation" forState:UIControlStateNormal];
[navButton addTarget:self action:@selector(pushNewView:) forControlEvents:UIControlEventTouchUpInside];
[self.view addSubview:navButton];
[navButton setHidden:YES];
}
@end
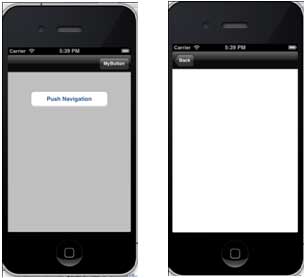
10. Now, when we run the application, we get the following output:
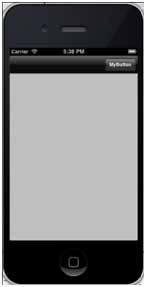
11. Click the “MyButton” navigation button to toggle the visibility of the navigation button.
12. Click the navigation button to display another view controller, as shown below: